How to Install WordPress and Get Set to Post, Part 2
So far, we have bought a domain name at goDaddy.com.
We’ve gotten hosting at Hostgator.com.
We’ve installed WordPress. Now we need to adjust some of the settings in our dashboard.
Don’t panic! This is really simple to do.
I will take your hand and walk you through it, okay?
You’ve already found how easy it is to install WordPress. It’s also one of the most customizable content management systems out there. You might want to
- adjust how your posts look
- how your commenting works
- how your link structure works
- and even turn your blog into a regular website if you want.
Let’s start with the most important settings in WordPress. Log in to your WordPress site.
Step 1: Writing Settings
The writing settings are mostly just for your convenience. These settings allow you to edit and post content easier.
Begin by setting how big you want your post box to be. The default is 20 lines. A large box gives you more room to write but you won’t see as many settings above the fold.
Change whether or not you want WordPress to automatically format emoticons or smileys. Also decide whether you want it to correct markup language.
Now you need to choose where you want posts and links to appear by default, which category you want. The default is uncategorized. You can change these on an individual basis in your actual post.
The next section is for posting by email without logging into your admin panel. I don’t usually change these settings; I’m always afraid if I set these up, there is more chance for someone to hack into my site. Just my opinion though.
The last thing to do is to setup blog & ping.
Here is a list of sites to ping. Copy and paste them into your settings.
http://blogsearch.google.com/ping/RPC2
http://api.feedster.com/ping
http://api.moreover.com/ping
http://api.my.yahoo.com/RPC2
http://blogdb.jp/xmlrpc
http://bulkfeeds.net/rpc
http://coreblog.org/ping/
http://ping.bitacoras.com
http://ping.bloggers.jp/rpc/
http://ping.cocolog-nifty.com/xmlrpc
http://ping.feedburner.com/
http://ping.rootblog.com/rpc.php
http://rpc.blogrolling.com/pinger/
http://rpc.pingomatic.com/
http://topicexchange.com/RPC2
http://www.blogdigger.com/RPC2
http://www.blogpeople.net/servlet/weblogUpdates
http://xping.pubsub.com/ping/http://rpc.icerocket.com:10080/
http://rpc.technorati.com/rpc/ping
http://api.feedster.com/ping
http://api.moreover.com/RPC2
http://ping.syndic8.com/xmlrpc.php
http://api.my.yahoo.com/RPC2
http://www.bitacoles.net/ping.php
http://www.blogdigger.com/RPC2
http://www.blogoole.com/ping/
http://www.blogoon.net/ping/
http://www.blogpeople.net/servlet/weblogUpdates
http://www.blogroots.com/tb_populi.blog?id=1
http://www.blogshares.com/rpc.php
http://www.blogsnow.com/ping
http://www.blogstreet.com/xrbin/xmlrpc.cgi
http://blog.goo.ne.jp/XMLRPC
http://bulkfeeds.net/rpc
http://coreblog.org/ping/
http://www.lasermemory.com/lsrpc/
http://www.newsisfree.com/xmlrpctest.php
http://ping.amagle.com/
http://ping.bitacoras.com
http://ping.blo.gs/
http://ping.bloggers.jp/rpc/
http://ping.blogmura.jp/rpc/
http://ping.feedburner.com
http://ping.myblog.jp
http://ping.rootblog.com/rpc.php
http://ping.weblogalot.com/rpc.php
http://ping.weblogs.se/
http://www.popdex.com/addsite.php
http://rcs.datashed.net/RPC2/
http://rpc.blogrolling.com/pinger/
http://rpc.weblogs.com/RPC2
http://www.weblogues.com/RPC/
http://xping.pubsub.com/ping/
http://xmlrpc.blogg.de/
http://blogsearch.google.com/ping/RPC2
http://rpc.odiogo.com/ping/
Click Save Settings.
Step 3: Reading Settings
Now let’s attack the reading settings. These settings let you change how your visitors see your site. It’s the settings for how the content appears.
Okay start by setting up how you want your front page to look.
By default, your front page will show your latest posts. But if you want to have is show a different page this is where you set it. You might want a static page to show if you have services you offer or something.
For the other settings just leave them at the default.
Click Save Changes.
Step 4: Discussion Settings
Make sure your set up how the comments are setup for articles by default. You can always adjust these on a per change these on a per-article basis later.
Then choose your basic settings for comments. This is where you choose whether you want people to register or not and how the comments are ordered.

Setup your email notifications and spam moderation settings, next. Do you want an email every time someone comments? Set that here. You can also choose whether or not you want to moderate comments before they go live as well
Check the show avatars in comments button and choose your default avatar.
Step 5: Permalinks Settings
I could probably write an entire post on Permalinks.
What is Permalink Structure?
Basically Permalinks are the permanent link for your individual post. You want them to be pretty. The default structure is ugly. It includes a question mark and the Post ID. It looks like this:
http://www.countryroomdesigns.com/?p=123
So what you want to do is customize your permalink so you your URL looks like this:
http://www.countryroomdesigns.com/1005/happy-with-your-home-but-dont-ignore-the-garage/
So Which Permalink Structure Should You Use?
For example, you could use just the post number:
www.yoursite.com/2349/
Or you could make it just use your title:
www.yoursite.com/your-title-here/
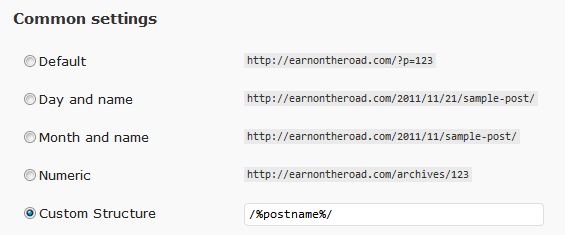
You can use a combination of different factors to craft your permalinks. By default WordPress has a few different structures you can choose from.
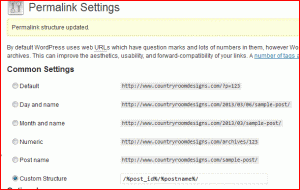
Personally, I use a custom Permalink Structure that looks like this:
Just put that code in the custom structure and click the box. Click Save Changes.

These are the most important settings in WordPress. There are dozens of different ways you could setup your blog. It would take us days just to explore all of them. These we discussed here are the foundation settings for almost all blogs.
Next time, we will discuss plugins, themes and customizations.
If you have any problems, questions or just want to talk, leave a comment below.
For the next six weeks, beginning February 25, I am participating in Tiffany Dow’s Freaking Fantastic Blog and List Building Challenge . I will be posting some awesome content 5 days a week here. Be sure to sign up for my list (either on the right or below) as my subscribers will receive some fantastic free gifts during this challenge. And don’t forget to leave a comment below. I use CommentLuv to link to your blog.


